Your art slot is Thursday at 1:15. Forty-five minutes, twenty-four kids, six tables pushed into a horseshoe, one sink down the hall, and a cart of tempera somebody else used this morning. The plan in your head is roughly "paint something autumnal," and you already know how that ends.
The gap between a good idea and a lesson you can run is where planning time disappears. A workable art lesson plan for elementary classrooms isn't a longer document. It's a shorter one with the right fields filled in: one observable objective, a set number of minutes for each stage, materials counted per table, and a rubric that says exactly what evidence you'll collect.
What follows is one complete Grade 3 lesson on value, written for a regular classroom with shared tables and no art room, plus a printable worksheet and a template you can reuse for any project this year.
The Art Lesson Plan Template Your Class Can Use
Most weak art plans don't fail because the project is dull. They fail because three or four fields are missing, so the lesson collapses the first time a table spills water or the demo runs long. Eight fields fix that, and all eight fit on one page.
| Plan field | What to write | Example entry |
|---|---|---|
| Learning objective | One observable action tied to one art concept | Students will arrange three values of one color to show depth in a landscape |
| Standard link | The National Core Arts Standards anchor the lesson supports | Creating: Anchor Standard 1, generating artistic ideas |
| Duration | Total minutes split into demo, making and sharing | 45 min: analysis 5, demo 7, making 20, pause 3, sharing 10 |
| Materials list | Quantity per student and shared supplies per table | Per student: one 9 x 12 sheet, one printed value strip, pencil. Per table: one tray of three tempera colors, one water cup, paper towels |
| Vocabulary | Three to five terms, each with a visual cue | Value, tint, shade, with a value strip printed for each student |
| Procedure | Numbered stages with timings | 1. Visual analysis 5 min, 2. Demo 7 min, 3. Making 20 min, 4. Midpoint pause 3 min, 5. Gallery share 10 min |
| Differentiation | One support and one extension | Pre-cut value strips for support; mix a fourth value for extension |
| Assessment | Evidence collected and the rubric used | Sketch checkpoint plus one-sentence explanation, scored on the rubric later in this guide |
Start with the objective, because every other field leans on it. It names one observable action tied to one art concept. "Students will arrange three values of one color to show depth" is checkable, since you can look at the paper and count three values. "Students will explore color" isn't, because nothing changes in the room if they don't.
The standard link keeps the plan defensible when an administrator walks through. The National Core Arts Standards organize visual art around four processes, Creating, Presenting, Responding and Connecting, and define 11 anchor standards. A value lesson sits under Creating, Anchor Standard 1, and naming it takes one line while giving you the language your evaluation rubric already uses.
Working through the rows that get skipped
Duration is where optimism enters. Write minutes, not blocks: 45 total, with 5 for analysis, 7 for demonstration, 20 for making, 3 for the midpoint pause and 10 for sharing. If a painting task leaves less than 20 minutes of making, shrink the paper rather than the thinking time.
Materials belong in two lists, per student and per table. A single combined list is how you end up with six glue sticks for twenty-four children and a queue at the back.
- Vocabulary: keep it to three to five terms and attach a picture to each one. Value, tint, shade, and the printed strip in their hands does the work of a definition.
- Procedure: numbered stages with timings, so a substitute can run it and you can see at a glance which stage will overrun.
- Differentiation: one named support and one named extension. Not a paragraph of options.
- Assessment: name the evidence now, whether that's a sketch checkpoint, a spoken explanation or a photographed work sample.
Open a blank document and fill all eight fields for one lesson before you read further. The rest of this guide expands each field, and it's easier to rewrite your own plan than to build one from nothing at the end.
Writing Objectives Grade Levels Can Actually Measure
An objective states what students will do. Feelings aren't measurable, and neither are adjectives. The verb you choose sets the ceiling on what you can collect evidence for, and the ceiling moves as children get older.
| Grade band | Objective verbs | Making time | Evidence to collect |
|---|---|---|---|
| Kindergarten | Identify, observe, name | 15-20 min | One sketch and a spoken description |
| Grades 1-2 | Experiment, arrange, combine | 15-20 min | Two tried materials and a one-sentence purpose |
| Grades 3-5 | Compare, revise, justify | 20-25 min | Sketch with revision marks and a written explanation |
Those verbs aren't arbitrary. The California visual arts standards show the progression in action: kindergarten students identify a purpose for an artwork, first graders use observation and investigation before making art, and by second grade students make art or design with different materials and tools to explore personal interests, questions and curiosity. The same standards name connecting tasks, such as creating artwork about events in home, school or community life.
Notice what those verbs reward. A teacher can look for a stated purpose, an observational sketch, experimentation with at least two tools, or an artwork tied to a familiar event. None of it requires judging talent.
One broad goal turned into a checkable sentence
Here's the move that makes a whole section of your plan work. Take a second-grade mixed-media lesson and write the objective like this: "Students will observe a local object, create a mixed-media representation using two materials, and explain how the finished work connects to community life."
Three things are now visible to you at a glance. You can see the two materials on the table. You can hear the explanation. You can read the connection to community. That objective also writes its own rubric, with criteria for observation, material use, artistic decision-making and explanation, which is a very different instrument from one that grades how pretty the result looks.
The rule that catches most objectives: if you can't point at the evidence in a student's hands or hear it in their words, the objective is still a wish.
The objectives to rewrite on sight are the ones built on product quality. "Make a beautiful picture," "create a neat pattern," "finish a good drawing," all of these describe what you hope to see rather than what a student will learn to do, and they move the grade toward neatness and away from decision-making.
Take the objective sitting in your plan right now and rebuild it with one verb from your grade band. Kindergarten gets identify or name, grades 1 and 2 get experiment or combine, grades 3 to 5 get compare, revise or justify. Everything else in the document falls in line behind that sentence.
Materials and Setup for a Regular Classroom
Most published art plans read as though you have a sink, a drying rack and a room that belongs to art. You have twenty-four students, shared tables, one water source, and a space that needs to be clear for math at 2:05. Plan for that room.
You're in good company. In the 1999-2000 school year, 56% of public elementary schools that offered visual arts had a dedicated room with special equipment, compared with 67% for music, according to the National Center for Education Statistics survey of arts education. Access thins out as children move up, too: National Endowment for the Arts data show 44% of students had kindergarten teachers reporting visual-art access at least two days per week, against 15% by fifth grade. Lean materials aren't a compromise. They're the format.
| Material | Quantity for 24 students | Substitute if missing |
|---|---|---|
| Tempera paint in three primary colors | One bottle per color per table, 6 tables | Watercolor cakes or washable markers |
| Pencils and erasers | 24 pencils, 12 erasers, extras in a cup per table | Crayons for the sketch stage |
| Paper towels and trays | 1 tray and 1 roll per table, 6 of each | Newspaper taped to desks |
| Glue sticks | 1 per table, 6 total | Masking tape for collage pieces |
| Plastic cups for water | 6, one per table | One shared pitcher with a towel |
The setup that saves the most minutes
Cover desks with newspaper or a plastic tablecloth before the bell. Set one tray of supplies per table so nobody wanders to a central cupboard, and claim one shelf or a patch of floor where wet work can dry for a full day. Finished pieces go into a labeled folder per student or a flat rack, because work that gets stacked while damp comes back as a single grey object.
The slip that costs the most time is handing out paint before the demonstration. Twenty-four brushes start moving while you're still explaining, then six students ask what to do and the instructions get repeated table by table. Demonstrate first with the trays capped and waiting, then release them one table at a time so the room stays quiet enough to hear the directions.
Print this and tape it inside the supply cupboard: supplies on tables, drying space claimed, cleanup roles assigned, early-finisher plan posted.
Cleanup roles are worth naming out loud before anyone opens a bottle: two water carriers per table, one tray runner, one floor checker. Rotate the jobs weekly so the same students aren't always hauling water while others always wash brushes.
If you want ready-made lessons to adapt rather than build, Kuraplan offers free AI art resources for teachers that save the blank-page stage.
Running a 45-Minute Five-Step Studio Lesson
The lesson runs as a studio cycle rather than a craft instruction. One objective, one demonstration, one constrained making task, one pause, one critique. Here's how the 45 minutes lay out.
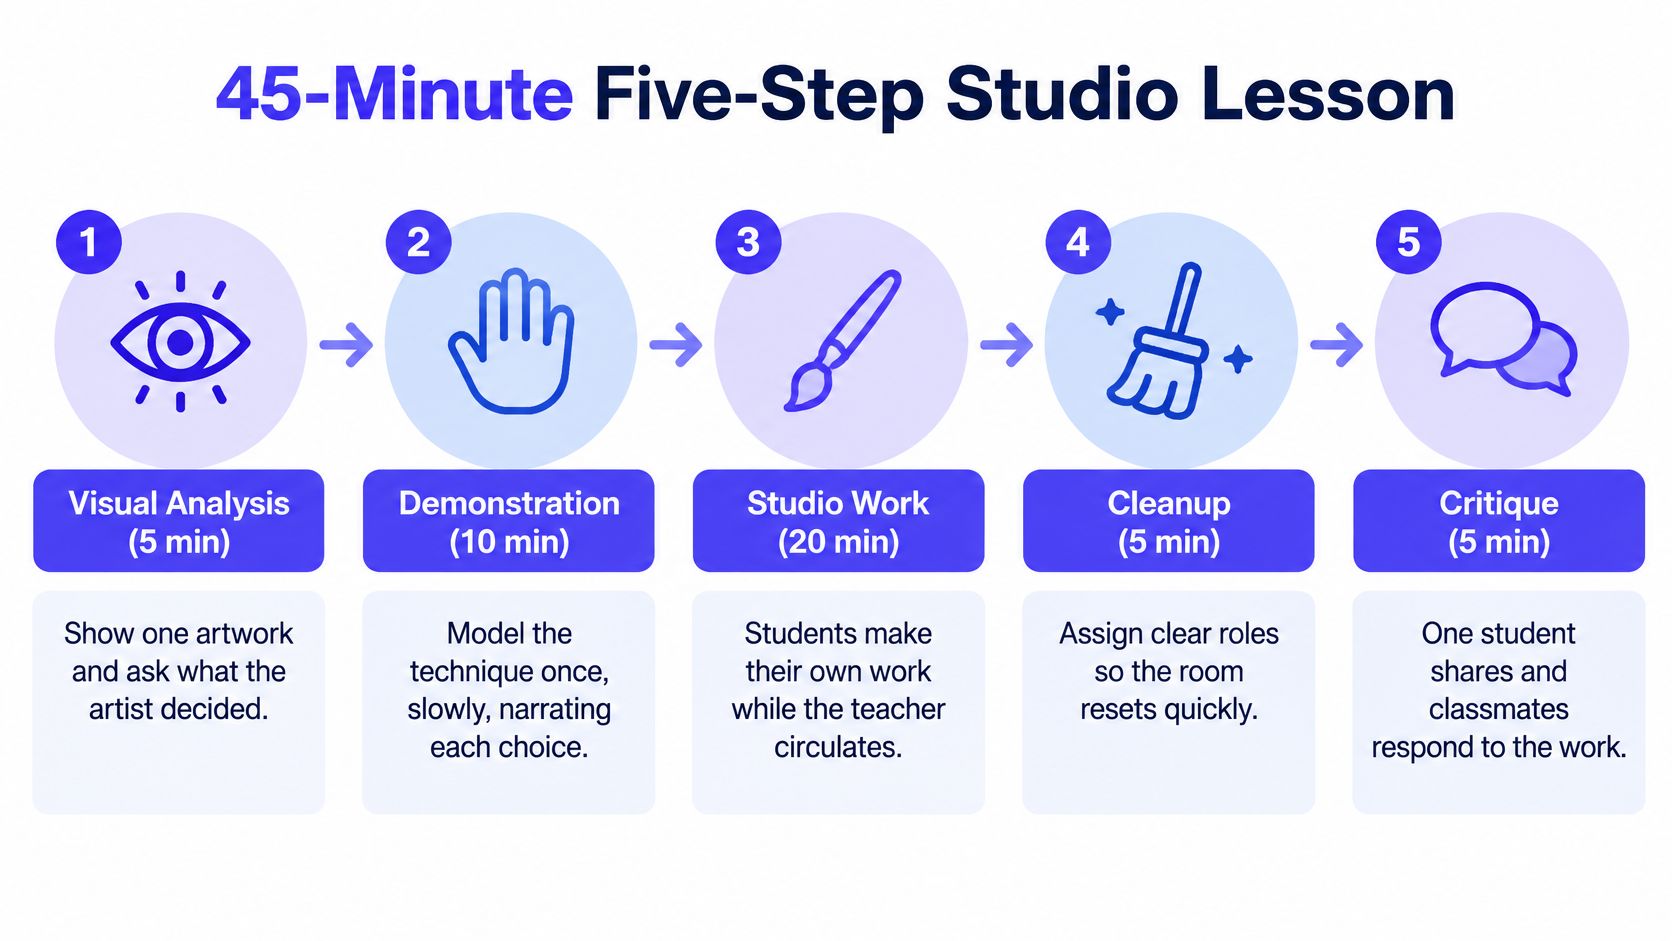
1. Visual analysis, 5 minutes. Show one artwork and ask a single question: what did the artist decide? The slip here is talking too long. Two minutes of your voice, three minutes of theirs.
2. Demonstration, 7 minutes. Model the technique slowly with the vocabulary words already on the board, and keep the paint in the cups until you finish. Narrate the choices out loud, including the one you'd make differently.
3. Constrained making, 20 minutes. Students work inside a fixed rule, such as three values and no more. Constraints produce better decisions than open choice under time pressure. Circulate and run one formative check at the ten-minute mark, asking each group to name what they tried.
4. Midpoint pause, 3 minutes. Every student names one successful choice and one revision. This is what turns the rubric into feedback during the lesson instead of a verdict after it.
5. Critique and reflection, 10 minutes. A gallery walk where each student leaves one sentence explaining an artistic choice.
Why the structure holds up
A studio cycle like this keeps concept and skill tied together, which is exactly where art instruction tends to drift. Connecticut's art curriculum guidance describes the cycle as one observable objective, a brief visual analysis, explicit vocabulary, a constrained making task, formative checks and a rubric-based reflection. The same guidance notes the failure mode: in one study of elementary teachers who had completed an art-methods course, only 33% of in-service respondents reported teaching art, and when they did, instruction leaned on basic skills rather than critical understanding.
Spend your assessment evidence across three dimensions, artistic decision-making, technical control and explanation of intent, and collect one work sample plus a short explanation from each student.
Write the five stage names on the board on day one, with the minutes beside them. Rehearse the handoff from demonstration to making, because that transition eats more time than any single activity in the lesson.
Adapting Each Lesson for Multilingual and Inclusion Learners
"Add more visuals" is the most repeated and least useful line in differentiation. A student can watch a demonstration, copy the technique perfectly, and still be unable to explain a choice or take part in the critique. Visuals solve the input problem. They don't touch the output problem.
The gap is documented. Research on elementary art teachers found that nearly all participants had to create their own visual aids, translated materials or pictorial guides for English-language learners, and many lacked training in using translation and digital-support tools, as reported in this study of elementary art instruction. Teachers are building the supports from scratch at 7 a.m.
Three pathways every plan should carry
Build each lesson around three parallel outcomes instead of one: what students make, what art concepts they understand, and what language they can use to describe process and meaning.
- Making pathway: offer a choice of media and larger tools where grip is an issue. Chunkier brushes, short handles, pre-cut shapes and a choice between drawing and collage all keep the objective intact.
- Concept pathway: replace wordy success criteria with picture-supported ones. A three-panel card showing dark, medium and light values teaches the target faster than any sentence on the board.
- Language pathway: give multilingual vocabulary with an image beside each term, plus a sentence frame. "I chose ___ because ___" carries a full artistic explanation on two words of English.
Say the collage lesson in Grade 2 is the test case. A student still developing English points to the tissue paper and the oil pastel, names both materials by gesture plus a word, and completes the frame orally. A student with attention needs works from a visual step card with four pictures and a sand timer on the table, and the same frame is scribed by a partner.
What counts as evidence: an oral or recorded reflection is a reflection. If the assessment depends on writing, you're measuring English, not art.
Recording the explanation in the student's own words takes twenty seconds with a tablet and protects the grade. For ready-made differentiation strategies that go beyond pairing students, keep a bank of sentence frames and picture criteria in the same folder as the rubric.
Scoring Process and Product with a Simple Rubric
A finished drawing tells you what a student produced on one afternoon with the materials that happened to be in the cupboard. It doesn't tell you what they decided, what they'd change, or whether they understood the objective. That matters most when a class gets one session and no follow-up.
There's a second reason to score art-specific criteria only. A review of arts education research found that across ten proposed capacities, seven lacked conclusive evidence, and effects on general academic performance largely disappeared in experimental studies, as summarized in this review of arts education research. Promise artistic decision-making and explanation of intent. Don't promise a math gain.
| Criterion | Developing | Proficient | Advanced |
|---|---|---|---|
| Artistic decisions | Chooses a color or shape without a reason | Makes one deliberate choice tied to the objective | Makes several choices and explains how they work together |
| Technical control | Materials used without clear purpose | Uses the demonstrated technique with reasonable control | Adapts the technique to reach a specific effect |
| Explanation of intent | Names the subject only | Explains one choice in a complete sentence | Links choices to the objective and a personal or community connection |
| Revision | Makes no change after the midpoint pause | Makes one revision based on feedback | Makes a revision and explains why it improved the work |
How to use it without turning it into a gradebook
Read the rubric aloud at the start of the lesson. Students should know what quality looks like before they touch paper, not after. Then collect at least one work sample plus a short explanation, and note what changed at the midpoint so revision becomes visible rather than assumed.
Score the explanation first. It reveals whether the student understood the objective, and it tells you how to read the product. A child who chose grey for the sky on purpose and explains why is not making the same error as a child who used grey because the blue ran out.
The California Department of Education visual arts standards make the same point about process: creating, presenting, responding and connecting are written as separate processes but happen together in real art practice, so students can earn credit for planning, purposeful material choices, reflection and revision even when their painting looks nothing like the one on the next desk.
That's why the rubric is a feedback tool first and a grade second. A student who made a different but purposeful choice should score well, and a rubric that can't reward that is measuring compliance. If you'd rather start from a working scale than a blank table, this rubric generator produces criteria you can edit down to four rows.
Printable Student Worksheet for a Grade 3 Value Lesson
Print one sheet per student, one side of paper only, and keep it in the process folder so the evidence survives to conference night. It fits a standard folder when trimmed, and it does most of the assessment work for you.
- Top strip: name, date, and the objective as a sentence starter the child completes, "I can arrange three values to show depth." That line is also your learning target on the board.
- Box 1, value strip: three squares labeled dark, medium and light, with a picture key beside each, a black circle, a grey circle and a white circle. Students paint one value per square before they start the scene, which gives you a two-minute check on whether the concept landed before the work begins.
- Box 2, midpoint check: two sentence frames, "One choice that worked is ___ because ___" and "One change I will make is ___." Fill this in during the three-minute pause, not at the end.
- Box 3, final reflection: "I chose ___ for my darkest value because ___," followed by a three-row self-check where the student marks Developing, Proficient or Advanced before you score anything.
- Bottom corner: a small box for you to record an oral reflection in the student's own words, so the assessment doesn't depend on writing fluency.
Leave the middle of the sheet open for drawing ideas and thumbnails. A worksheet that fills every centimeter leaves no room for the thinking you're trying to see.
The self-check before teacher scoring is the part worth protecting. Students who mark themselves against the same three levels you'll use are far more likely to revise without being asked, and you get a record of whether they understood the criteria or just the task.
Teach One Lesson This Week and Refine It Next Time
Pick one lesson from the next two weeks and fill all eight template fields before you do anything else. It takes fifteen minutes and saves the twenty you'd otherwise lose mid-lesson.
Then run three checks. Compare your objective against the grade-band verbs and rewrite it if it describes a product. Confirm the supply list against the setup checklist, counting per table rather than per class. Print the rubric and read it to yourself as though you were nine years old.
After you teach it, write down what broke. The stage that ran over, the bottle that emptied, the three students who couldn't explain a choice. Those notes are the revision, and the second delivery is always faster than the first.
Drafting the first version is the slow part, and it's the part worth outsourcing. Kuraplan creates standards-aligned lesson plans in minutes, including differentiated instruction and an assessment rubric, and every plan is editable, so you keep the objective and the evidence decisions in your own hands while the boilerplate gets filled in. If you want the steps on the board, it also turns any lesson plan into a slideshow with one click.
Kuraplan gives you a filled-in starting point for exactly this kind of lesson: standards-aligned art plans with differentiation and a rubric already attached, editable down to the wording of your objective. You'd still choose the evidence and adjust the minutes to your Thursday, but you'd start from a draft instead of a blank page. Visit Kuraplan to draft your next elementary art lesson and teach it this week.