Tsunami Formation 4 Panel — free printable diagram
Free geography resource for teachers · CC BY-NC 4.0
About this illustration
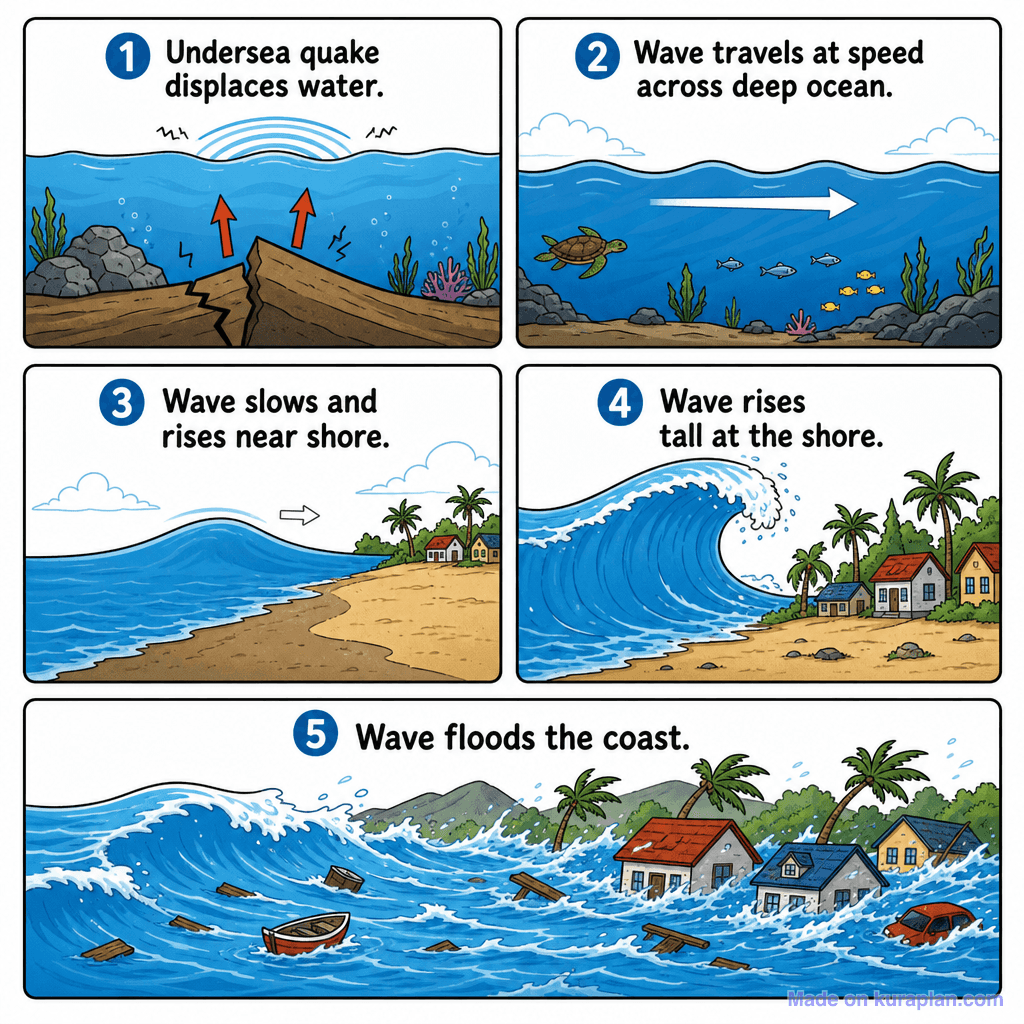
This multi-panel illustration visually explains the five-step process of a tsunami, from its origin to coastal flooding. Panel one shows an undersea earthquake displacing water, followed by the wave traveling across the deep ocean in panel two. Panel three depicts the wave slowing and rising near the shore, culminating in a tall wave approaching the coast in panel four. The final panel illustrates the destructive flooding of coastal areas, affecting houses and infrastructure. This image teaches the scientific sequence of a tsunami's formation and impact, suitable for earth science or natural disaster units. It would be excellent for slideshows, sequencing activities, or as a visual aid on a worksheet explaining natural hazards. The visual style is a clear, flat illustration presented in a comic strip format.
How a tsunami forms, step by step
A tsunami is a series of waves caused by a large, sudden displacement of water — most often an undersea earthquake that jolts the seafloor vertically. The diagram breaks that into stages: the seafloor moves, the whole water column above it is displaced, the wave crosses the open ocean almost unnoticed, and it rears up only as it reaches shallow water near the coast.
- Most common cause
- Undersea earthquake at a plate boundary
- Other causes
- Underwater landslides, volcanic eruptions, meteorite impacts
- Speed in deep ocean
- Up to about 800 km/h (500 mph)
- Height in deep ocean
- Often less than 1 metre
- Wavelength
- Can exceed 100 km
- Arrives as
- A series of waves, not a single one
- The trigger has to move water vertically. An earthquake that shifts the seafloor sideways displaces very little water, which is why not every undersea earthquake produces a tsunami.
- Unlike a wind-driven wave, which disturbs only the surface, a tsunami moves the entire depth of water from seabed to surface. That is where its energy comes from.
- In deep water the wave is extremely long and very low, so a ship at sea may pass over one without noticing it.
- Near the coast the shallow seabed slows the front of the wave while the water behind it piles up. The wave shortens and grows dramatically in height — the process called shoaling.
- The sea sometimes draws sharply back from the shore before the wave arrives, exposing the seabed. That drawback is a natural warning sign and means the water will return.
- A tsunami arrives as a wave train over hours, and the first wave is often not the largest — a point worth drawing out when students study coastal hazard planning.
How to use
- 1Right-click the image and choose “Save image as”, or use the download button.
- 2Use it in your classroom worksheets, slides or printables — free under CC BY-NC 4.0.
- 3Attribute as “Image by Kuraplan” or link back to kuraplan.com. Not for commercial resale.
Turn this image into a worksheet
This illustration is already in Kuraplan's editor — describe the worksheet you need and the AI builds it around the image in seconds.
Related illustrations
More from Mountains & Tectonics
Free worksheets on Tsunami Formation 4 Panel
All free worksheetsBrowse by subject
18 subjects · 5,116 free illustrations
Maths
1,894 free illustrations
Cross-Curricular
835 free illustrations
Science
815 free illustrations
English
612 free illustrations
Health
200 free illustrations
Social Studies
177 free illustrations
Religious Education
139 free illustrations
Music
128 free illustrations
Art
66 free illustrations
Drama
56 free illustrations
Social Sciences
48 free illustrations
History
47 free illustrations
Arts
26 free illustrations
PE
25 free illustrations
Te Reo Māori
24 free illustrations
Technology
16 free illustrations
Culture
7 free illustrations
Languages
1 free illustrations