Music Acoustic Guitar Labelled — free printable diagram
Free music resource for teachers · CC BY-NC 4.0
About this illustration
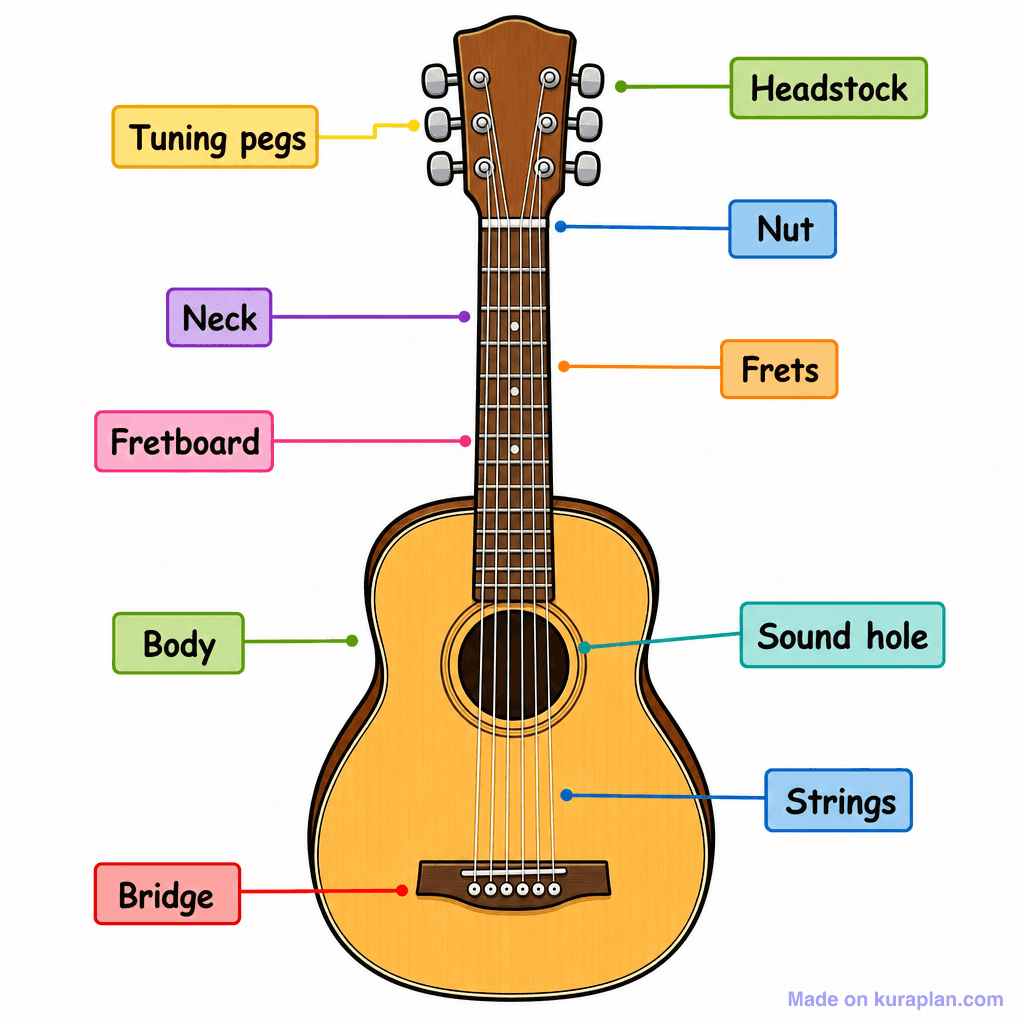
This image depicts a front-on view of a light brown acoustic guitar, clearly illustrating and labeling its various components. The labeled parts include Headstock, Tuning pegs, Nut, Neck, Frets, Fretboard, Body, Sound hole, Strings, and Bridge. This educational diagram is ideal for teaching students about musical instruments and their anatomy, suitable for use in music class worksheets, interactive slides, or a label exercise. The visual style is a clean, flat illustration with clear, vibrant labels.
The parts of an acoustic guitar
An acoustic guitar makes sound in two steps: a plucked string vibrates, and the hollow wooden body amplifies that vibration into a note loud enough to hear. Nearly every labelled part belongs to one of those two jobs — setting the pitch of the string, or amplifying it. The parts below are the ones normally labelled, listed from the top of the instrument down.
- Headstock
- The top of the neck, holding the tuning pegs
- Tuning pegs
- Also called machine heads — tighten or slacken a string to tune it
- Nut
- The ridge at the top of the neck that the strings pass over
- Neck and fretboard
- Where the fingers press the strings down
- Frets
- Metal strips dividing the fretboard into semitones
- Body
- The hollow soundbox that amplifies the vibration
- Soundhole
- Lets the sound out of the body
- Bridge and saddle
- Anchor the strings and pass their vibration into the body
- Strings
- Six, tuned E A D G B E from lowest to highest
- A string on its own is very quiet. Plucking it makes the bridge vibrate, the bridge vibrates the top of the body, and the body moves a much larger volume of air — which is the whole reason an acoustic guitar is hollow and an electric one need not be.
- Pressing a string down behind a fret shortens the length that is free to vibrate, and a shorter vibrating length gives a higher note. The frets are placed so each one raises the pitch by a semitone.
- The nut and the saddle are the two ends of an open string's vibrating length. Everything beyond them — headstock and bridge — holds the string but takes no part in the note.
- Standard tuning is E A D G B E from the thickest, lowest string to the thinnest, highest one. Tuning is done at the pegs, which change the tension in the string.
- Thicker strings vibrate more slowly and sound lower, which is why the six strings differ in thickness across the neck.
- The same parts are found on a steel-string and a classical guitar; the classical uses nylon strings and a wider neck. An electric guitar shares the neck parts but replaces the soundbox with pickups.
How to use
- 1Right-click the image and choose “Save image as”, or use the download button.
- 2Use it in your classroom worksheets, slides or printables — free under CC BY-NC 4.0.
- 3Attribute as “Image by Kuraplan” or link back to kuraplan.com. Not for commercial resale.
Turn this image into a worksheet
This illustration is already in Kuraplan's editor — describe the worksheet you need and the AI builds it around the image in seconds.
Related illustrations
More from Instruments — Labelled Diagrams
Free worksheets on Music Acoustic Guitar Labelled
All free worksheetsBrowse by subject
21 subjects · 5,539 free illustrations
Maths
1,894 free illustrations
Cross-Curricular
835 free illustrations
Science
814 free illustrations
English
612 free illustrations
Geography
549 free illustrations
Health
200 free illustrations
Social Studies
177 free illustrations
Religious Education
139 free illustrations
Art
66 free illustrations
Drama
56 free illustrations
Social Sciences
48 free illustrations
History
47 free illustrations
Arts
26 free illustrations
PE
25 free illustrations
Te Reo Māori
24 free illustrations
Technology
16 free illustrations
Culture
7 free illustrations
Business
1 free illustrations
English
1 free illustrations
English (ELA)
1 free illustrations
Languages
1 free illustrations